
By Kiana Wolford for The Gathering Garden LLC
Written April 24, 2026
This post contains affiliate links
Prep Time: 2 hours and 10 minutes
Overnight Proofing: 8 – 10 hours
Cook Time: 35 – 45 minutes
Cooling Time: 60+ minutes
Total Time: 11 – 13 hours and 45 minutes
Introduction
This simple sourdough recipe was created with beginner sourdough bakers in mind. In this recipe, you will find clear instructions that will guide you as you begin making sourdough bread. Baking sourdough can be tricky at first, and this recipe will tell you exactly what you need to know to make a successful loaf. To best prepare, read this entire recipe through before beginning.
Ingredients
- 150 grams of active sourdough starter
- 350 grams of room-temperature water
- 500 grams of unbleached bread flour
- 13 grams of salt
- Ice
Equipment
- Kitchen Scale
- Large glass mixing bowl
- Measuring Cup
- Danish Whisk
- Plastic Bowl Cover
- Flour Duster (Optional)
- Banneton
- Lame
- Bread Sling
- Dutch Oven
- Oven
- Oven mitts
- Cast iron pan/baking sheet
Click here to shop the products you will need to maintain your starter and bake your very own sourdough!
Before You Start
- Read through all steps before starting.
- The starter should double in size within 4 – 8 hours after feeding.
- Room temperature is around 68°F – 75°F.
- Dough will be sticky until the 3rd or 4th round of stretch-and-folds; this is normal.
Directions Day 1
- In a large glass bowl, add 150 g active starter.
- Pour 350 g of water into the large glass bowl.
- Use the Danish whisk to mix the starter with water until it dissolves.
- Add 500 g of unbleached bread flour and 13 g of salt into the bowl.
- Use the Danish whisk to combine all the ingredients to form a dough.
- Cover the bowl with the plastic bowl cover and let it rest for 30 minutes.
- After the rest, perform one set of stretch and folds:
- Grab one side of the dough, stretch it upward, then fold it over itself.
- Rotate the bowl 90°, repeat, and continue until all 4 sides are folded.
- Repeat this process every 30 minutes for 2 hours (4 sets total).
- Prep the banneton by dusting the inside with bread flour.
- Lightly dust a clean countertop with flour.
- Transfer your dough from the large glass bowl onto the floured surface.
- Stretch the dough into a rectangle shape.
- Fold the dough into thirds (like folding a letter, lengthwise).
- Starting at the end, roll the dough over itself into a ball.
- Shape your dough by tucking and pulling the dough toward yourself in a U-shaped motion to build surface tension.
- Once the dough is shaped, place the dough smooth side down into the floured banneton.
- Cover the banneton with the same plastic bowl cover.
- Place in the refrigerator overnight.
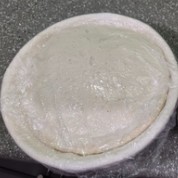
On the left is an example of dough that has been placed smooth side down into a floured banneton and covered with a plastic bowl cover.
Directions Day 2
- Place the Dutch oven into the oven.
- Preheat the oven to 450°F.
- Take the dough out of the refrigerator and remove the plastic bowl cover.
- Place the bread sling on top of the dough while it remains in the banneton.
- Flip the banneton upside down onto the sling so the dough is now smooth side up, on top of the sling.
- Using the bread lame, score the dough however you choose.
- After the oven has completely preheated with the Dutch oven inside, with oven mitts, carefully take the Dutch oven out of the oven and remove the lid.
- Use the bread sling to place the dough into the hot Dutch oven.
- Leave the flaps of the bread sling hanging outside of the Dutch oven and place the lid on top of the flaps.
- Use oven mitts to place the Dutch Oven into the oven and bake at 450°F for 24 minutes.
- Add 2-4 ice cubes to a cast-iron pan or baking sheet and place it on the shelf below the shelf holding the Dutch Oven.
- Ice will create steam for the loaf, which will allow the dough to expand fully and improve the crumb.
- After 24 minutes, lower the oven temperature to 425°F, remove the Dutch Oven lid, and remove the cast iron/baking sheet. There should be no ice left.
- Continue baking for 10–15 minutes, or until the crust is a deep golden brown.
- After the crust has reached golden brown, use oven mitts to remove the Dutch oven from the oven.
- Use oven mitts to grab the sling and lift out the loaf.
- Separate the dough from the sling and place the loaf on a cooling rack.
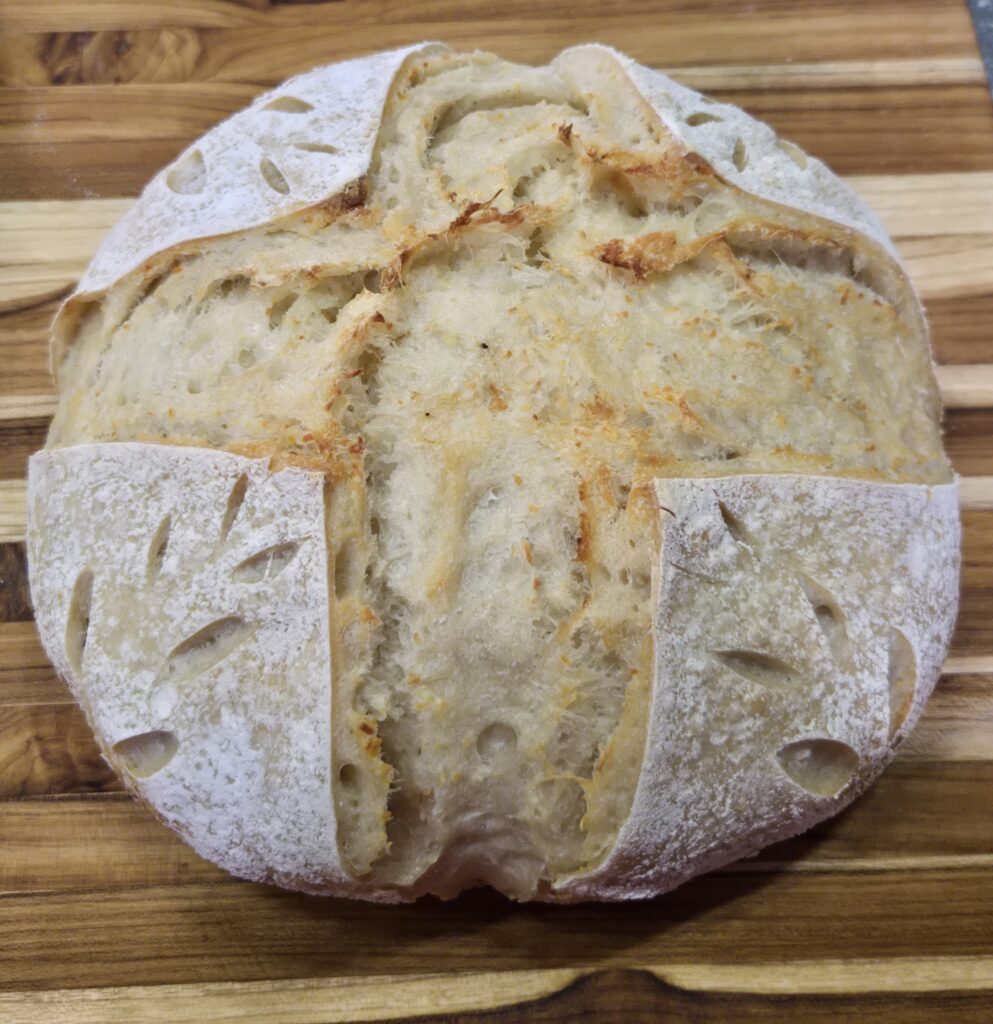
- Allow to cool for 1+ hours before slicing into it.
- Enjoy!
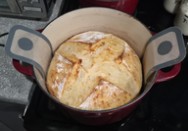
On the left is an example of the flaps of the dough sling hanging outside the Dutch oven.
Trouble Shooting
- Dense loaf → sourdough starter was not active
- Flat loaf → under proofed
- Burnt bottom → move to a higher rack
- Dough too sticky → do more stretch and folds
- Pale crust → bake longer without the lid
Want a printable version? Download it here.
Last Revised: 5/31/2026